 how-to
How to Prevent Dust in Glass Cabinets: 7 Steps
Table of Contents
- Why Dust Gets Into Glass Cabinets (and What It Costs You)
- Step 1: Check the Seals, Gaskets and Hinges
- Step 2: Choose the Best Weather Stripping for Glass Cabinets
- Step 3: How to Clean Glass Display Cases Without Streaks
- Step 4: Preventing Dust Buildup on Collectibles
- Step 5: Control the Room, Not Just the Cabinet
- Step 6: Safe Sealant Materials and Off-Gassing
- Step 7: Build a Preventative Care Routine
- Frequently Asked Questions
Last Updated: September 19, 2026
Why Dust Gets Into Glass Cabinets (and What It Costs You)
Dust always finds a way in. A glass cabinet with loose hinges and worn seals lets fine particles settle on shelves within days. For anyone storing collectibles, glassware, or memorabilia, that means constant cleaning and slow surface damage.
Dust enters a cabinet through three main routes:
- Gaps around doors and hinges
- Openings where panels meet the frame
- Airborne particles pulled in by static electricity
Step 1: Check the Seals, Gaskets and Hinges
Start by finding every gap. Open the doors and run your fingers along the edges. You are looking for three things:
- Rubber gaskets that have hardened, cracked, or pulled away from the frame
- Hinges that have worked loose, letting the door sit unevenly
- Sealing strips that have flattened or peeled off
British Standards Institution guidance on furniture hardware
Step 2: Choose the Best Weather Stripping for Glass Cabinets
The best weather stripping for glass cabinets depends on the gap size and door type. Brush seals suit sliding doors. Rubber gaskets work best on hinged doors. Silicone seals handle uneven gaps and humid rooms.
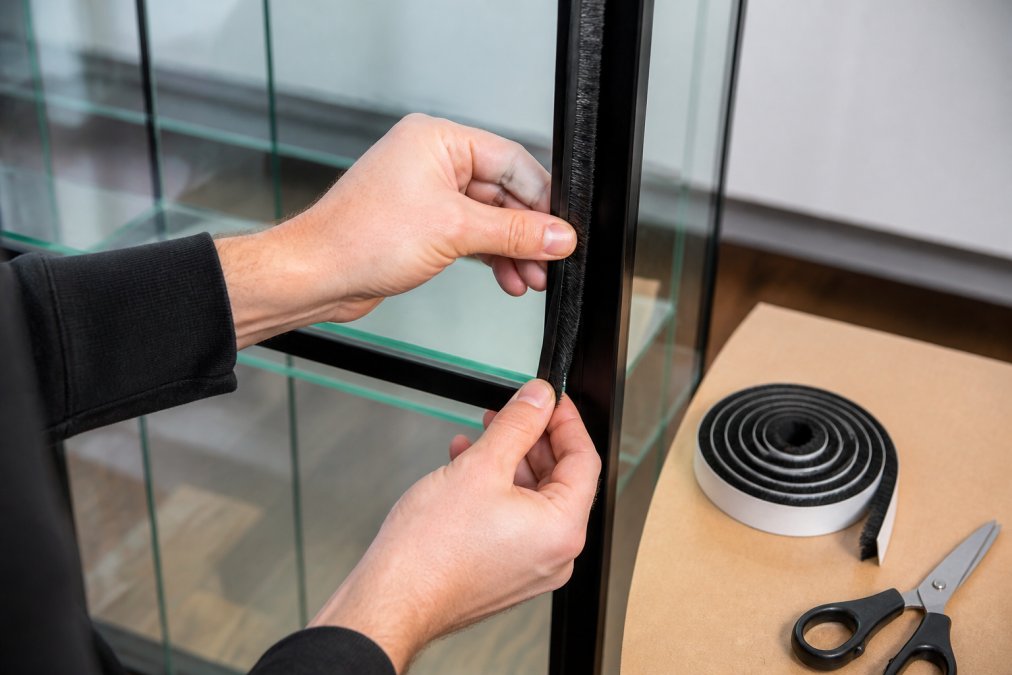
Here is how the three main options compare:
| Seal Type | Best For | Lifespan | Dust Blocking |
|---|---|---|---|
| Brush seal | Sliding doors, uneven gaps | 2-3 years | Good |
| Rubber gasket | Hinged doors, tight frames | 3-5 years | Excellent |
| Silicone seal | Humid rooms, odd shapes | 5+ years | Very good |
Brush Seals vs Rubber Gaskets vs Silicone Seals
Brush seals use fine bristles to block dust while letting air move slightly. They suit sliding glass doors where a solid seal would jam.
Step 3: How to Clean Glass Display Cases Without Streaks
Cleaning glass without streaks comes down to three things: the right cloth, the right solution, and the right technique. Skip any one and you get smears.
Follow these steps:
- Wipe the glass with a dry microfibre cloth to lift surface debris
- Spray a small amount of solution onto the cloth, never onto the glass
- Wipe in one direction, then buff with a dry section of the cloth
- Clean the frame and seals last, so loosened dust does not fall back onto the glass
Step 4: Preventing Dust Buildup on Collectibles
Preventing dust buildup on collectibles means treating each item as a dust trap. Glassware, ceramics, and fabric memorabilia all hold static electricity, which pulls particles out of the air.
A few habits make a real difference:
- Handle items with clean, dry hands to avoid leaving oils that grab dust
- Keep small pieces inside archival boxes or sleeves within the cabinet
- Avoid stacking items so air can move around each one
- Rotate displays less often, since every open door lets dust in
Step 5: Control the Room, Not Just the Cabinet
A sealed cabinet still collects dust if the room feeds it. Environmental control is the step most guides skip, and it is often the deciding factor.
Focus on three room conditions:
- Air circulation: fit a filter to vents and change it on schedule
- Humidity: aim for a stable level to reduce static and stop seals drying out
- Foot traffic: busy rooms kick up more airborne debris
Room-Specific Strategies for Dust Control
Different rooms need different tactics:
- Living rooms: vacuum regularly and keep the cabinet away from open windows
- Home offices: move paper stacks and printers away, as they shed fibres
- Retail spaces: place the showcase away from doorways and till areas where traffic is heaviest
- Bedrooms: keep the cabinet away from bedding, which sheds lint constantly
Cabinet placement matters as much as sealing. A cabinet beside a radiator or under a vent will always fight a losing battle.
UK government guidance on indoor air quality
Step 6: Safe Sealant Materials and Off-Gassing
Not every seal is safe for what you store. Some materials release gases as they cure, a process called off-gassing. Those gases can fog glass, tarnish metal, and damage archival items. This is the step almost every guide skips, and it is the one that matters most if you store anything delicate. Choosing inert materials prevents chemical degradation, yet even the most secure cabinet eventually requires careful maintenance when dusting delicate collectibles to ensure long-term preservation.
What Off-Gassing Actually Does
Off-gassing is the slow release of volatile organic compounds (VOCs) from adhesives, rubbers and plastics. In a sealed cabinet, those compounds have nowhere to go. They build up against the glass and settle on whatever is inside.
The damage is cumulative, not instant:
- Paper and textiles yellow and become brittle as acids deposit on the fibres
- Metals tarnish faster because the trapped compounds accelerate oxidation
- Glass and glazed ceramics develop a faint film that looks like dust but will not wipe off
- Photographs and prints fade as the compounds react with dyes and inks
Materials to Avoid Near Collectibles
Some sealants are fine for a kitchen cupboard and wrong for a display case. The ones to keep away from archival items are:
- Standard PVC foam tape, cheap, common, and a steady source of plasticiser vapour
- Solvent-based contact adhesives, strong smell, slow cure, high VOC load
- Natural rubber gaskets, degrade over time and release sulphur compounds
- Any sealant not rated for indoor use, outdoor grades often contain fungicides and stabilisers you do not want in a closed space
Materials That Are Safer
For cabinets holding paper, textiles, metals or anything with a market value, look for:
- Low-VOC silicone, flexible, long-lasting, and the safest common choice for hinged doors
- Archival-grade felt or polyethylene tape, used in museum and conservation storage, low off-gassing, gentle on frames
- EPDM rubber, more stable than natural rubber and a reasonable middle ground for general display use
Let New Seals Air Out Before Loading
Even a low-VOC seal needs a settling period. A practical routine:
- Fit the seal and leave the cabinet doors open
- Ventilate the room for 24 to 48 hours
- Close the doors and leave the empty cabinet sealed for another day
- Open it and check for any lingering smell before adding items
British Standards Institution guidance on furniture hardware
Step 7: Build a Preventative Care Routine
Preventative care keeps dust out for good. A short routine beats a big clean-up every time, but the routine only works if you understand why each task is on the list. A checklist you follow blindly gets skipped the moment life gets busy. A checklist you understand gets adapted.
Why Monthly, Not Weekly
Seals do not fail overnight. They harden, flatten and crack over weeks. A monthly check catches a seal in the early stage, when a wipe and a re-seat will fix it, rather than the late stage, when the door is letting in a visible stream of particles.
The Monthly Routine, and What Each Step Does
- Wipe glass panels with a microfibre cloth, removes the surface film before it bonds; a dry cloth first, then a damp one
- Check seals and gaskets for cracks, run a finger along the full length; a seal that feels stiff or leaves a residue is on its way out
- Tighten hinge screws, a door that has dropped by even a millimetre breaks the seal line along the whole edge
- Vacuum around the cabinet base, dust settles at floor level and gets drawn up by air movement
- Check the room filter, a clogged filter stops catching particles and starts recirculating them
- Look for new shelf gaps, shelves shift with load and temperature; a loose shelf lets air move between levels
The Annual Tasks Most People Forget
Some jobs are too infrequent to sit on a monthly list, which is exactly why they get missed:
- Replace seals on a schedule, not on failure. Rubber gaskets typically last three to five years, silicone five or more, brush seals two to three. Replace at the end of the range, not when you notice dust.
- Re-check door alignment after any move, redecoration or change of flooring. A cabinet that was flush on carpet may not be flush on hard floor.
- Inspect the cabinet back and top. These are the panels people never look at, and they are common entry points for dust from wall cavities or ceiling voids.
- Review what is stored inside. Items added over the year may have introduced new dust sources, such as fabric, untreated wood or unpacked cardboard.
Keep Spares on Hand
If you want a cabinet that holds its seal from day one, consider premium glass display cabinets with locks and lights. Options for flatpack delivery or a build service, with free nationwide delivery, can ensure the frame and doors line up properly and stay airtight. Check out our range to protect your collectibles and keep your display pristine.
Frequently Asked Questions
What is the best way to seal glass display cabinets against dust?
Start with self-adhesive brush seals or silicone seals along the door edges, then check the hinge side where most gaps appear. Rubber gaskets work well for heavier doors. Clean surfaces with isopropyl alcohol before applying any sealing strip so it bonds properly. If your cabinet has visible shelf gaps or a loose magnetic catch, address those too, because dust travels through the smallest openings.
Do glass display cabinets actually keep dust out?
A well-sealed cabinet reduces dust dramatically, but no enclosure is completely airtight unless it uses a full airtight enclosure design. Standard cabinets with rubber gaskets and brush seals cut airborne debris by the majority. The remaining dust comes through hinge gaps, cable holes for lighting, and when you open the door. Pair good seals with a regular preventative care routine for the best results.
How do I stop dust from entering the hinge side of a cabinet?
The hinge side is the weakest point on most cabinets because the door swings away from the frame. Fit a thin brush seal or silicone strip behind the hinge line, and check that the hinge itself is tight. If the door sags, adjust the hinge screws so the gap closes evenly. Furniture hardware that has loosened over time is a common cause of dust ingress on that side.
Can static electricity attract dust to glass cabinets?
Yes. Glass and acrylic surfaces build up static electricity, which pulls airborne debris toward them. Wiping glass panels and shelves with an anti-static microfibre cloth reduces this charge. For collectibles inside the cabinet, anti-static brushes help too. A scratch-resistant lacquer on timber shelves also limits where particles can settle, making surface debris easier to remove.
Dust is relentless, but it is beatable. Seal the gaps, control the room, and keep to a simple routine, and your glass cabinet stays clear for years. Display Cabinets UK builds cabinets with locks, lights, and a proper fit, available as flatpack or with our build service and free nationwide delivery. Get started with Display Cabinets UK and keep your showcase pristine.